SpamSentinel can be run under Domino 14 but certain steps must be taken when installing or upgrading Domino to ensure SpamSentinel will continue working properly.
With the introduction of Domino version 14, HCL has changed their recommendation for the Windows account that Domino should be installed to run under. This change requires updates to be made to the versions of SpamSentinel currently available. We are working hard to resolve these issues as soon as possible.
Prior to Version 14, Domino would install to run under the Windows account Local System also known as NT AUTHORITY\SYSTEM which has the SID S-1-5-18.
Starting with Domino 14, the installer now allows for selection of the Windows account to run under and the default choice is selected to be Local Service also known as NT AUTHORITY\LocalService which has the SID S-1-5-19.
In order for SpamSentinel to be installed to Domino 14 (or newer) or to continue running on a server where Domino is upgraded in place, Domino will need to be running using the Local System account. The steps required depend on your situation — find the scenario below that matches yours.
Scenario 1: Installing Domino 14 or 14.5 for the First Time
During the installation of Domino, enter NT AUTHORITY\SYSTEM into the field 'User Name' when the installer gets to the step 'Input Windows User Name'.
|

Scenario 2: Domino 14 or 14.5 is Already Installed and SpamSentinel is Not Yet Installed
If you have already installed or upgraded to Domino 14 or 14.5, the HCL Domino installer may have configured the Domino Windows service to run as the Local Service account or a named service account created specifically for Domino. Both of these account types have insufficient permissions for the SpamSentinel installer to complete successfully.
Before running the SpamSentinel installer, you will need to change the Domino Windows service to run as the Local System account. This is a straightforward change in Windows Services Manager:
- Open Windows Services Manager by pressing Windows + R, typing services.msc, and pressing Enter
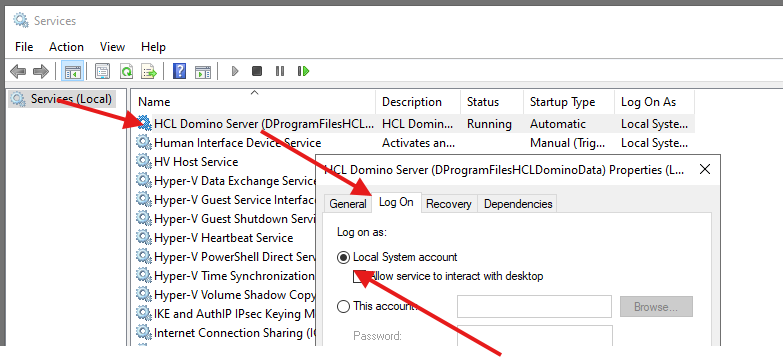
- Locate the HCL Domino Server service and double-click it to open its properties
- Click the Log On tab
- Select Local System account
- Click OK
- Right-click the HCL Domino Server service and select Restart
- Once Domino has fully restarted, proceed with the SpamSentinel installation
After SpamSentinel is installed and confirmed working, the Domino service should remain configured to run as Local System.
Scenario 3: Upgrading Domino In-Place on a Server Where SpamSentinel is Already Running
If you are going to be updating Domino in-place on a server where SpamSentinel is already running, you will also need to make a simple edit to two of SpamSentinel's .xml files. These are required because the Domino 14 installer moves the location of the notes.ini file from the Domino program directory to the Domino data directory.
Perform these steps after you shut down Domino but before you run the Domino 14 installer.
1. Find the directory where the SpamSentinel Scanner service files are located. These are typically on the same drive as the Domino Program files and in a directory named <drive>:\SpamSentinel\Scanner\Partition1
|

2. Open the SpamSentinel.xml file in this directory for editing then update the entry for <NotesIniFile> so that the notes.ini file path uses the drive and folder name of the Domino Data directory instead of the Domino Program directory.
|

3. Find the directory where the SpamSentinel Reporting service files are located.
|

4. Open the SpamSentinel.xml file in this directory for editing then update the entry for <NotesIniFile> so that the notes.ini file path uses the drive and folder name of the Domino Data directory instead of the Domino Program directory.
|

After following these steps, proceed with the Domino upgrade. SpamSentinel will then be able to continue to run as expected once Domino is started again.
If you have questions about this information or need further help, please contact technical support.
Was this article helpful?
That’s Great!
Thank you for your feedback
Sorry! We couldn't be helpful
Thank you for your feedback
Feedback sent
We appreciate your effort and will try to fix the article